Step #1: In order to make paper snowflake, you will need to clear a work station and place all the materials out in front of you. To make the pattern, you can either tape , glue, glue dot or staple all the parts together. GLUE DOTS work the best and are available at any large craft store.
Step #2: First thing we do is to cut your squares. A normal sized pieced of computer paper will not work because it is rectangular. You will need to CUT IT to form a square. You will need 6 equal squares for a perfect 3D snowflake. The smaller your squares, the smaller your snowflake. Whatever sizing you choose--- you will need 6 equal sized squares. Now fold all 6 squares of paper diagonally in half TO FORM A TRIANGLE. They don't have to be perfectly perfectly perfect :)

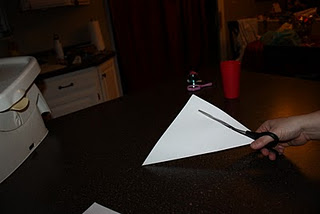
Step #3: Take the scissors and cut the 3 lines on each side of all the triangles starting from the folded edges. ( IT SHOULD BE LIKE A TACO--- THE OPENING AT THE TOP. THE FOLD AT THE BOTTOM) Make sure that you don't cut all the way up ! If you do…start over! If any of the unfolded edge does get cut, don't glue or tape it back together. You can try to make all of your lines perfectly straight and the same distance apart--- but they will look beautiful any way you " slice it."


Step #4: After all of your cuts are done. Unfold the paper. Start in the MIDDLE of the square. You're going to simply meet up the ENDS , making a "roll." First roll the first 2 paper lines which are inside. Roll them together and form a small tube. Apply little bit of tape or glue dot here and hold the tube properly so that it sets. Move your fingers only after the tube is set.


Step #5: Now flip the paper OVER onto the other side. Your square will now be resting on the "roll " you just created.

Again take 2 more ENDS and roll them to meet each other and form a tube. Apply a glue dot or tape on the new tube again and hold it till it sets properly.


Step #6: Continue to flip the snowflake over- alternating the sides you are " meeting the ENDS " on. Secure each end with a glue dot or some tape just as we did above. Continue until you have a completed SNOWFLAKE POINT.


It's simple and you'll be a snowflake star in no time.
If you have trouble check out this video done by the "creator" of this snowflake, at least in our eyes. Miss Mel from Night Light Stories. She's our personal friend and her website is downloadable original stories for kids.